How to Link a Revision Number to a Property in SolidWorks (Manual & PDM Methods)

Ken Maren
If you work in SolidWorks, keeping revision information consistent across models, drawings, and title blocks is essential for clean documentation and error-free manufacturing. In this guide, you’ll learn step-by-step how to link a revision number to a SolidWorks property, whether you manage revisions manually or use SolidWorks PDM.
Section 1: How to Manually Link a Revision Number to a Property in SolidWorks
SolidWorks makes it easy to store a revision inside a Custom Property—then pull that value into your drawing title block, notes, and BOMs.
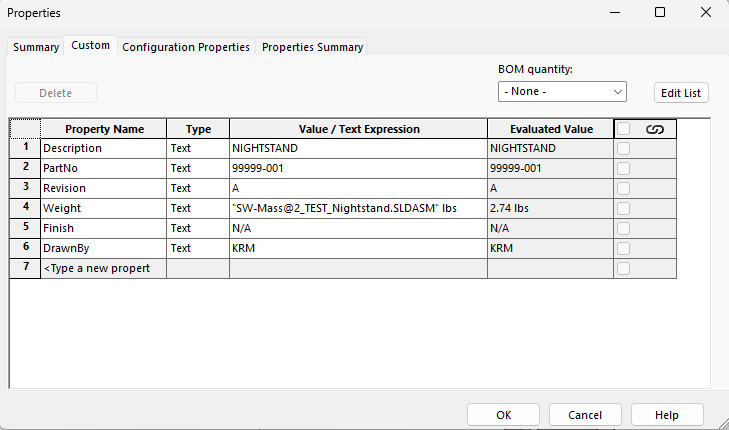
Step 1: Create a Revision Custom Property
- Open your part, assembly, or drawing.
- Go to File → Properties.
- In the Custom tab, create a property:
- Property Name: Revision
- Type: Text
- Value: A, B, 1, 2, etc.
- Click OK.
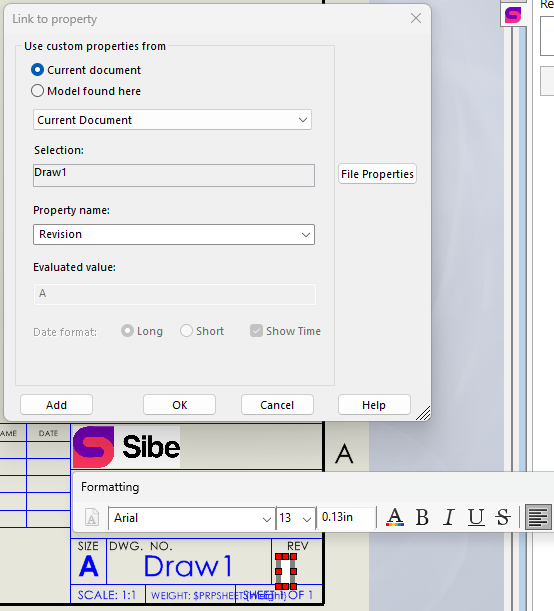
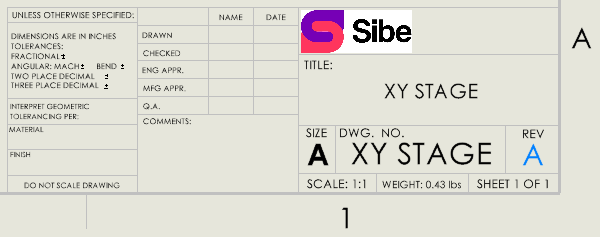
Step 2: Link the Revision Property to Your Drawing Title Block
- Open your drawing.
- Right-click the sheet → Edit Sheet Format.
- Insert a note: Insert → Note.
- With the note selected, click Link to Property.
- Choose one:
- This Document → Revision (if property is in the drawing), or
- Model Found Here → Revision (if property is in the part/assembly).
- Finish and select Exit Sheet Format.
Step 3: Update Your Revision Anytime
When you update File → Properties → Revision, your drawing updates automatically.
Press Ctrl+Q to rebuild if needed.
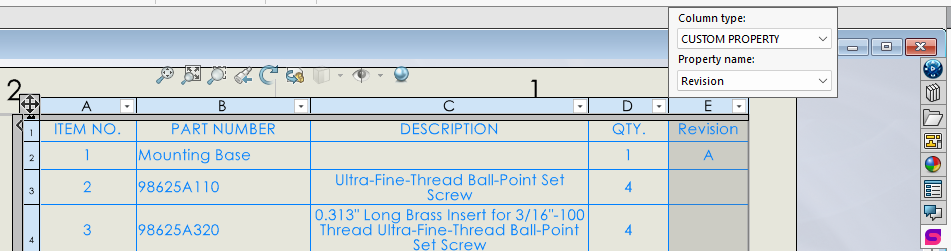
Step 4: Add Revision to a BOM (Optional)
If you want your BOM to include the revision:
- Edit your BOM.
- Add a column.
- Set the column property to Revision.
Section 2: How to Link the Revision Using SolidWorks PDM (Automated Method)
If you're using SolidWorks PDM, let the vault revision value drive the Revision property automatically. This avoids manual updates and ensures consistency across all documents.
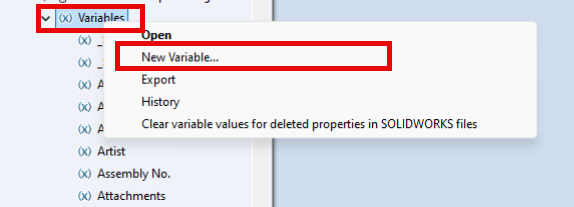
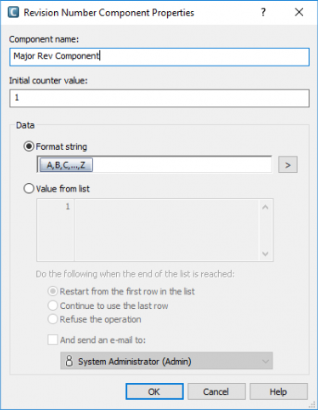
Step 1: Create a Revision Variable in PDM Administration
- Open PDM Administration.
- Go to Variables → right-click → New Variable.
- Name it something like REVISION.
Step 2: Connect the Variable to the PDM Revision Scheme
- In PDM Admin, open your Revision Scheme.
- Assign your REVISION variable to the scheme so the vault updates it during revision transitions.
Step 3: Map the Vault Variable to a Document Property
- In PDM Admin, open File Types.
- Select the file types (sldprt, sldasm, slddrw).
- Create a mapping:
- PDM Variable: REVISION
- File Property: Revision
- Enable "Write to file on check-in" if available.
Step 4: Trigger Revision Updates Through the Workflow
When your workflow transition changes the revision, PDM writes the value into the file property automatically. No manual editing required.
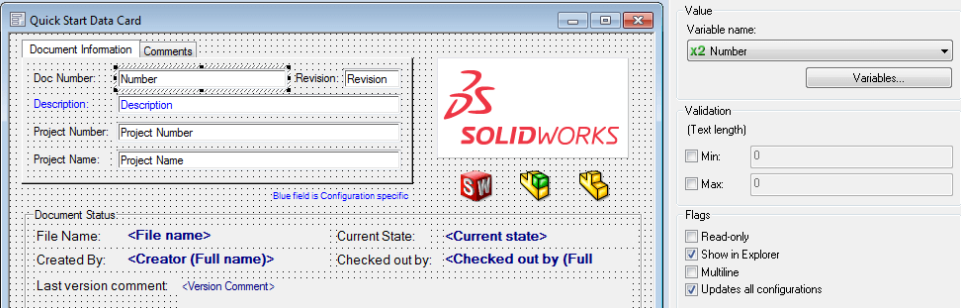
Step 5: Display the Revision in Your Drawing
Use the same note method as the manual workflow:
- Insert a note → Link to Property → choose Model (or This Document) → select Revision
Since PDM writes the revision to the property, your title block stays synced to the vault.
Whether you’re managing revisions manually or using the full power of SolidWorks PDM, linking your revision number to file properties is the key to controlling documentation and avoiding mistakes. With the steps above, you can maintain a cleaner workflow and ensure your drawings always show the correct revision, automatically.
Book a free Demo with Ken to see Sibe PDM in action


Ken Maren
Chief Solutions Architect
SolidWorks Expert with 30+ Years Experience
Redirecting...
Latest Cloud PDM Articles

.png)


.svg)